Friday, December 27, 2013

DIY String Christmas Trees


First off, MERRY CHRISTMAS!  I hope everyone has had a lovely holiday so far.  :)  Now, down to the crafts - these were pretty fun to make, and I think they turned out nice!  As you can see, the glue is still visible on the dark red tree.  If I had known, I would have made more light-colored ones… obviously!  I used cotton yarn for the green and red tree, and white embroidery thread for the white tree.  I like how the white embroidery tree turned out the best - it is delicate, and you can't see the glue.  (It would look especially nice with red and green stars as opposed to the silver stars.)  Next year!

MATERIALS
Yarn of string
Glue (I used homemade glue - 1 cup flour, 1/3 cup sugar, 1 and 1/2 cup water, 1 tsp white vinegar.)  I hear you can also use watered down mod lodge or Elmer's glue.  
Paper
Tape
Plastic wrap
Confetti (for decoration, if desired)

INSTRUCTIONS
Create a cone out of your paper and tape - if you are creating multiple trees, make different sizes of cones.  Cover the paper cones in plastic wrap.  Take your string or yarn, and dip a good section of it (maybe 1 foot) into the glue.  Use your fingers to wipe off any excess glue, and start wrapping the string around the plastic-covered cone.  How closely you wrap your string around the cone will affect how dense your trees are.  

You will need to wrap your glue covered string around the cone several times - you can go up and down as much as you want, until you feel like the cone is sufficiently covered.  Keep dipping the string in the glue (and wiping off the excess) as you go.  When you are finished, let the string covered cone dry overnight.  In the morning, gently pull the hardened string off of the cone - this might take some maneuvering, but overall it should be pretty easy.  Glue the confetti onto the tree.  Voila!  

INSPIRED BY:  
(This blog is in spanish - you will need Google Translate for this one!)


Sunday, December 15, 2013

Quote Art: DIY Defeat

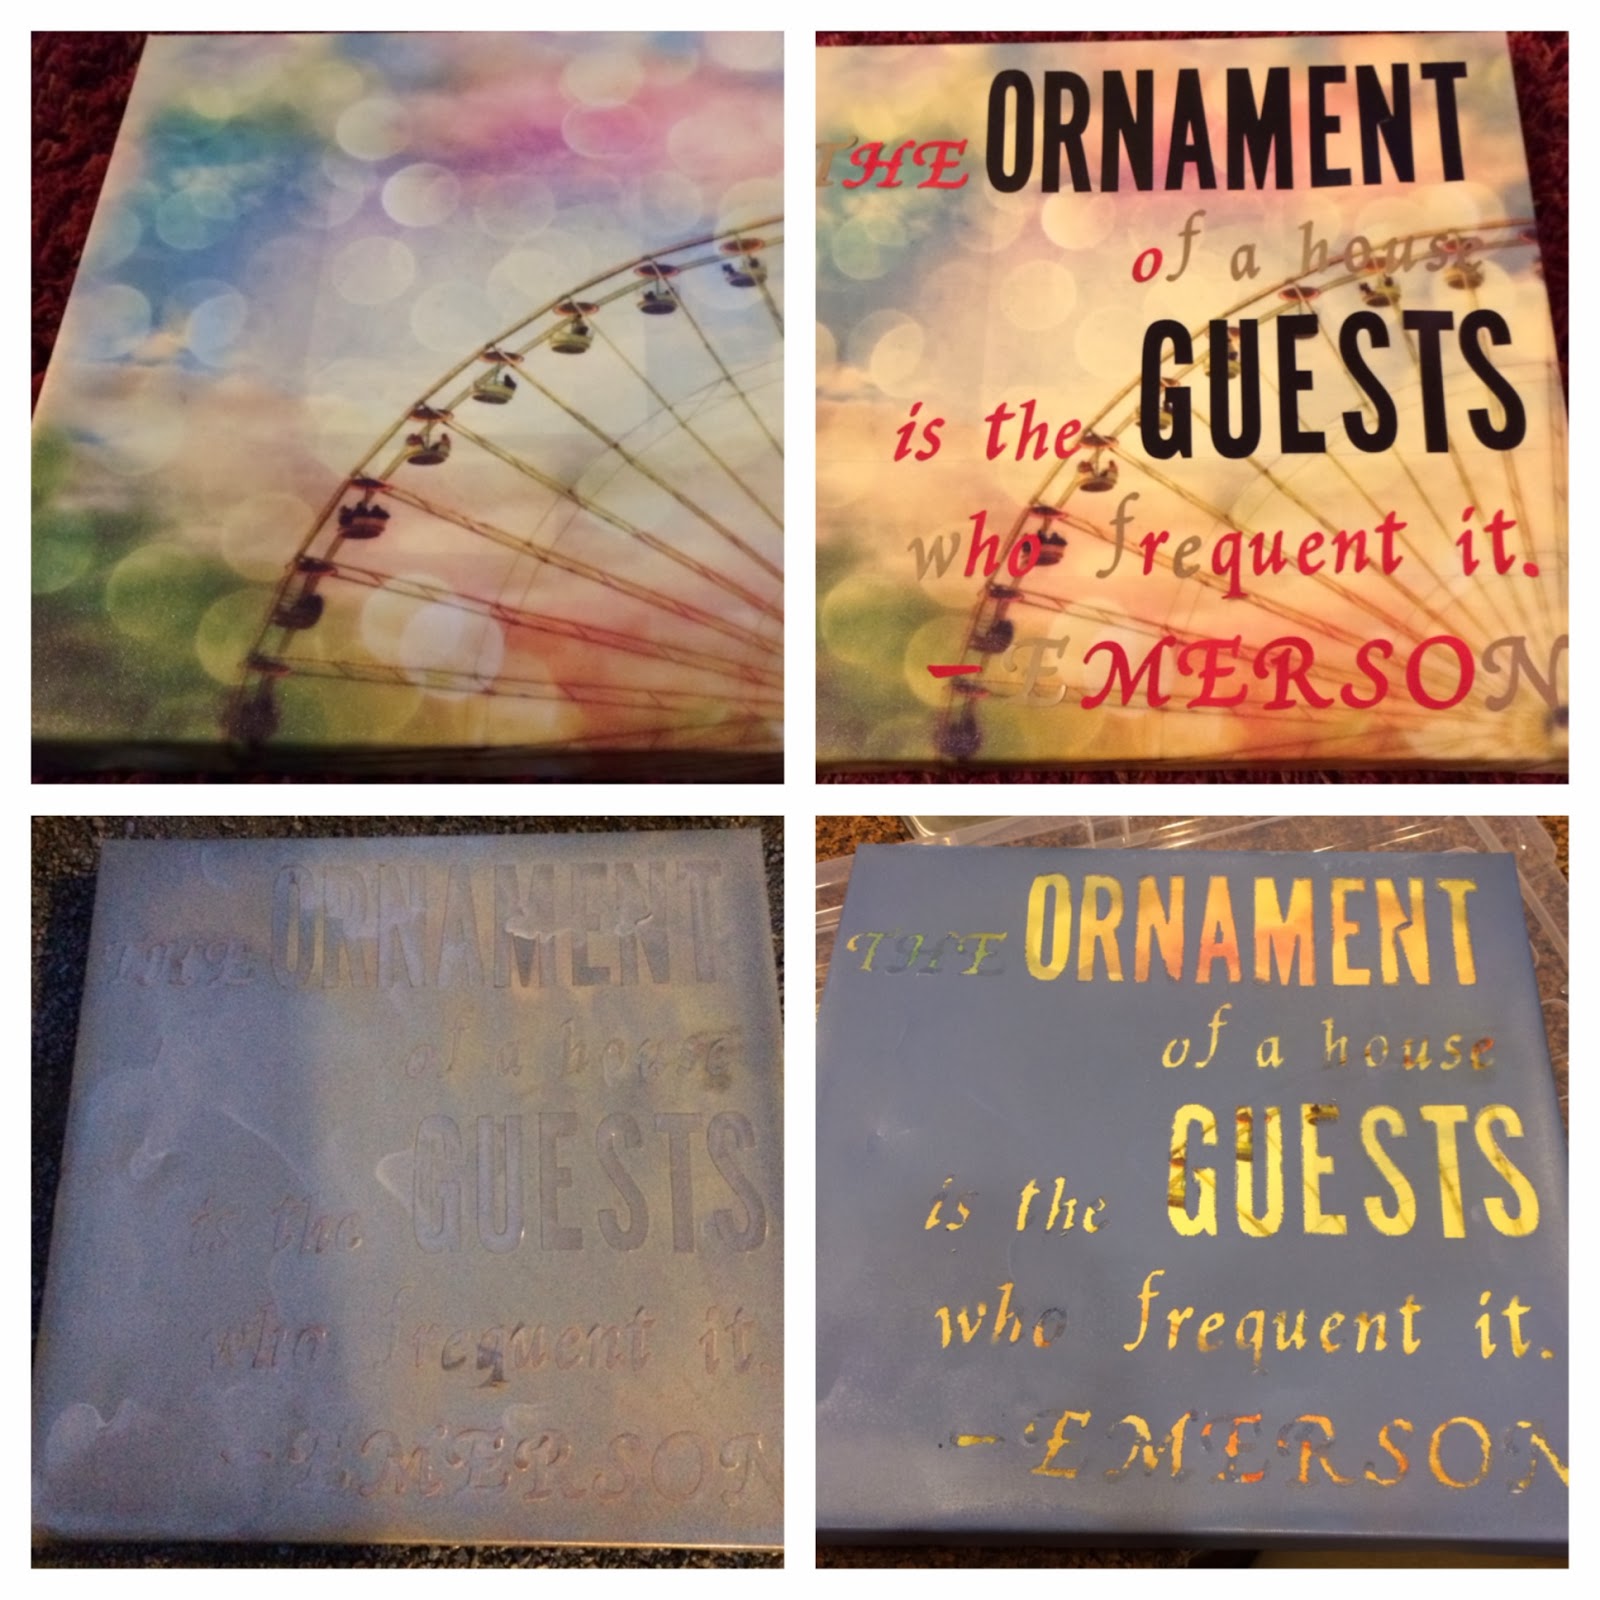
This was SUCH a let down, as I have been wanting to do this for awhile.  I have never had any kind of quote art in my house, but after seeing all of the inspiring images on Pinterest, I thought it was time to put something up.  We need some more art in our guest bedroom, so I was especially intrigued by a quote from Ralph Waldo Emerson saying that "the ornament of a house is the friends (I used "guests") who frequent it".  How cute would that be on the wall of a guest bedroom!?  Fortunately, I had an old canvas picture of a ferris wheel from Target I no longer had a use for, so this DIY project was officially on.

I took my old canvas picture, and arranged vinyl letters (I also used stickers, which was a mistake…) on the canvas to spell out my quote.  (A ruler will be important in this step.)  Once the quote was arranged, I used spray paint to paint a layer of colored paint all over the canvas.  When the paint had dried, I pulled off the vinyl letters.

The GOAL of this project was to have a fun, colorful, and whimsical display of my guest bedroom quote on the wall.  In reality, the spray paint pooled in odd places on the canvas, and the paint bled under the letters.  I used a mixture of vinyl letters (larger) and sticker letters (smaller), and the vinyl letters worked MUCH better than the stickers.  There was still some bleeding from the paint along the edges, but not NEARLY as much as the stickers.  In short, this project did not turn out how I wanted, and I am disappointed!


Why it failed:
I used sticker letters instead of all vinyl letters.  Vinyl letters work much better!
I did not use a paint primer before painting the color.  This would probably have minimized the bleeding.
I used spray paint - I think if I had rolled the paint on by hand, I would have had more control of the coverage.

LAME!!  You can see from my picture that the edges (especially on the smaller letters) have bled a lot, and the quote is pretty hard to read.  On top of that, I think it looks pretty darn amateur, which is NOT what you want from a DIY home project.  Regardless, hopefully this will help you to create your own quote art that is better than mine!

Inspired By:
Infarrantly Creative:  http://www.infarrantlycreative.net/2012/02/guest-room-art.html, from my Pinterest.  

Wednesday, December 11, 2013

Sunday, December 8, 2013

Ornament Decorating Party

Some friends and I hosted an ornament decorating party this past weekend, and it was AMAZING.  Besides the fact that having most of my crafting supplies out and on one table was [very] disturbing, it was great to get together and be creative with a group of lovely ladies.  We came up with some really unique ways to decorate the plain glass ball ornaments, and of course I had to share some of the highlights.  I got the glass ball ornaments from Michaels when they were 50% off, and I think you can use almost anything you can think of to decorate these guys.  The sky is literally the limit!
Glass paint - stained glass effect

Seed beads and mod podge


Colorful feathers inside

Glue on ribbon, tissue paper or confetti - the one on the lower right used confetti with mesh fabric. 


Stickers and confetti

Squirt floor polish inside the ornament to coat completely, shake out the excess, then add a good amount of loose glitter.  Tilt the ornament so the glitter coats the entire ornament.  Voila!  Glitter ornaments!


Crochet netting around the ornament, or stick ribbon inside it!


Tissue paper and paint, stained glass paint effect and seed beads


Puff balls!

Christmas napkins and mod podge

cupcake liner and seed beads (with mod podge)

Paint - stained glass effect.

Mod podge and lace

Confetti and glitter star accent

Feathers and matching paint

Fake snow (on the inside), ribbon and red ball accents

NOTE:  Photo's have been processed with the Shake It App for the iPhone.


Wednesday, December 4, 2013

Paint Chip Art


I actually made this about 6 months ago, right before we moved into our house.  I had seen a photo of someone using paint chips to create a giant wall-size version of a Marilyn Monroe picture (inspiration link below), and thought "what an awesome idea!  I have to try it!".  Naturally, I chose to do one of an artichoke.  So here are the steps!  Be warned - this is tedious and time consuming…but the result really is fabulous!  

Materials:
Paint chips.  Lots of paint chips.  (From Lowes - I will explain why.)
A square paper punch
Glue
A canvas  
This website:  http://www.heavymural.com
This program:  Olympic Paints Desktop App, http://www.olympic.com/color/desktop_apps

Instructions:
Choose an image you'd like for your mural - be creative!  When you have an image picked, www.heavymural.com will take any image and pixelate it for you.  (Yes, amazing that it exists!)  I had to try several different images before I was satisfied with how the pixelation turned out, so don't be afraid to play around!  Pay close attention to the "pixels per row" box, as this will determine just how large your mural will be (and how big a canvas you need), depending on how big your square punch is.  I used a 1/2 inch-sized square punch for my artichoke mural.  


Once you have your pixelated image, print it out on your color printer, and draw gridlines through it, separating each pixel.  You will then label letters across the top for each column, and numbers along the side for each row (like a spreadsheet!  This can probably be done on the computer somehow too, but you get the idea).  Now comes the tedious part.  Start a spreadsheet, and make a list of each pixel involved in your mural (Now that you have gridded them out, you can label them A1, A2, A3, etc).  Open the Olympic Paints Desktop App on your computer, and open a digital copy of your pixelated image from HeavyMural.com.  Using the desktop app, you will be able to select each individual pixel from your image, and color match it to the coordinating Olympic Paint color.  BRILLIANT!!  Make a note of each paint color match for each pixel on your spreadsheet, so each pixel has a coordinating color.  (Make a note of the color name and the color code/number, as this will make your life easier when you have to find all of these paint chips at Lowes)  Yes, this will probably take you awhile.  But it is worth it!  Stay with it!

When you are FINALLY finished, you can use pivot tables (if you are excel savvy) or old fashioned elbow grease to count up how many pixel squares of each paint color you will need for your mural.  Now hit up Lowes!  I admit it, I did have to go to 2 different local Lowes stores to get all of the green paint chips I needed for my artichoke.  BUT, remember that they will be put to good use!  Next, you start hole punching with your square hole punch.  (I used envelopes to keep all of my colors grouped together as I went.)  When you have all of your squares/"pixels" ready, you can start gluing them to your canvas!  To be precise, I went through and gridded my canvas with pencil beforehand (you can see this a little in my images), which I do recommend doing.  However, I did have trouble erasing all of the pencil afterwards….so USE CAUTION!  (Let me know if you have a trick to erase pencil from canvas!)


Using your list of pixels and their matching colors, you can now go through and glue the paint chip squares to their coordinating location on your canvas.  This is the best part - you will slowly be able to see your image take shape!  When finished, you can coat the canvas with a sealer (I used acrylic spray). Mod podge may also work!  And VOILA!  Your very own piece of paint chip art!  (And for super cheap!!)


Inspiration:
Apartment Therapy Reader Project:  


Tuesday, December 3, 2013

Sequin Snowflake Ornaments


I had so much fun making these!  First off - do not be deceived.  They are time consuming.  You will also need LOTS of pins and LOTS of sequins.  I personally was on a Damages marathon at the time, so this was no problem.  :). Finding pins with a head that was larger than the sequin hole was surprisingly difficult - make sure you use pins large enough !  I also included the date by using a number hole punch.  (The Martha Stewart one was more expensive online than I thought - use your 40% off coupon at Michaels if you can!)  Otherwise, I plan to give these as gifts, but might have to make one for myself!

Materials:
Foam ball
Pins (with heads bigger than sequin holes)
Sequins
Ribbon 
Snowflake punch 
Number punch 

Instructions:
Start by pinning a group of sequins to the foam ball in a circle, leaving a small space in the middle.  (You'll see why later). Continue to pin sequins to the ball in a circular formation around your last sequins (your circles will get bigger and bigger!) until the ball is covered.  Cut a snip of ribbon to hang the ball from, and pin the ribbon loop into the small hole you left at the beginning.  Nice it's time to punch your snowflakes!  Carefully pin your paper snowflake punches to the ball (there should be some small random holes between the sequins that you can use).  If desired, also punch some numbers, and pin the date into the ball as well.  Voila!  Merry disco-ball Christmas!


Inspired By:
An item seen in the Teensy Turtle Etsy Shop. 

Monday, December 2, 2013

Sunday, December 1, 2013

Jack-O-Lantern Luminaries


I realize it is now December, but I made these for Halloween a few months back and wanted to get them on here before long!  They turned out super cute, and I plan to get them out again next year.  (What better thing to feature for my first post!)  Highly recommended for a porch or in the window.  :)  


Materials:
Mason Jars
Colored tissue paper
Black construction paper
Mod podge
Sponge brush 

Instructions:
Tear the tissue paper into strips, and glue the strips to the side of the mason jar (covering completely).  Once covered, paint mod podge over the tissue-covered jar with the sponge brush.  (I found a sponge brush worked much better than a paintbrush...!)  Leave to dry overnight.

Cut out jack-o-lantern faces from the black construction paper (pumpkin-type faces for the orange jars, Frankenstein faces for the green jars, etc!) and glue onto the tissue-covered jars with more of the mod podge.  Leave to dry, and pop a candle into the jar for a pleasing glow!  (I found a tea light was difficult to light inside the jar, so an LED tea light worked perfectly!)

Inspired By:  
Our Best Bites (they also have a link to get the jack-o-lantern face templates!)