Showing posts with label Recipes. Show all posts

Monday, September 28, 2015

What's For Dinner #1: The Cheesecake Factory Fire Roasted Artichoke

Aren't they attractive vegetables?

The Cheesecake Factory Fire Roasted Artichoke has always been one of my favorite things EVER.  Just ask my husband or any of my friends and family - it is physically impossible for me to dine at the Cheesecake Factory without ordering this.  Plus, as any artichoke lover knows, it is very rare for artichokes to be served whole at a restaurant.  

So here is how you can re-create this amazing dish in the comfort of your own home.  I also want to brag that this recipe was taken from a very reliable Cheesecake Factory source, so it's legit people!  :)

Ingredients:
  • Artichokes (1 per person).  Note that 3 halves are usually served in the Cheesecake Factory dish...!
  • Olive Oil
  • Salt
  • Pepper
  • Aioli:
    • Mayo
    • Olive Oil
    • Salt
    • Pepper
    • Lemon juice
    • Parsley (chopped)
    • Minced Garlic

Instructions:
Just like in my Perfect Artichoke recipe, start by trimming the thorny ends of your artichoke leaves.  This is not required, but certainly makes for a more attractive presentation (not to mention a more comfortable eating experience).  


You'll also want to cut off the top 1 inch or so of the artichoke, as shown in this picture:


Next, cut off the stem of the artichoke.  I personally do not like eating the stem, but my husband does.  If you choose to, you'll just need to peel down the stem (using a vegetable peeler) since it has such a tough and stringy exterior.

Next, boil the artichokes for 20 minutes.


When the artichokes are tender after boiling in water, set them aside to let them drip dry.  The Cheesecake Factory apparently drip dries them for 2 hours... but I definitely did not do this...!  (Who has time for that??)  Regardless, as soon as the chokes are relatively dry, cut them in half.


Since the artichokes are now tender, you'll be able to easily scoop out the center thorny portions with a spoon.


Lay the hollowed out artichokes on a baking sheet, and broil them for about 10 minutes.  Make sure you keep an eye on them during this time - the broiling is to get a nice charr on them for coloring and for flavor!  The Cheesecake Factory likely grills the artichokes at this stage instead of broiling them, but I am not the best with a grill... so my Fire Roasted Artichokes were technically Oven Roasted.  If you know your way around a grill, by all means - grill away!  (You'll want to drizzle the chokes with olive oil and salt/paper before grilling or broiling!)


Now, time to make the Cheesecake Factory garlic aioli!  Full disclosure - I am aware that the Cheesecake Factory typically serves their artichokes with not one but TWO delicious dipping sauces. I'm afraid I only have the recipe for the garlic aioli, but if anyone out there has the recipe for the vinaigrette, please let me know!!  (BTW, there have been times where I am only served 1 dipping sauce when dining at Cheesecake - if this happens to you, YOU'RE MISSING OUT.  Make sure you ask for the second dipping sauce!)

For the dip, mix together the mayo, garlic, salt, pepper, lemon juice and parsley.  I'm afraid I do not have measurements for these, so use your best cooking judgement.  We LOVE garlic so I put a ton in our aioli, but you may prefer hardly any - up to you!  Put your chef's hat on!


Mix together until creamy!


And that's it, you're done!  It's really pretty low maintenance, right?  


Hopefully your finished product closely resembles the Cheesecake Factory's - I felt like mine did, and I was SUPER happy about this.  Now, if only I could figure out how to grill, and how to make that vinaigrette dipping sauce...!


Monday, June 8, 2015

Sweet On You


1.  Sweet & Saltines from Country Pleasures.  This recipe of Trisha Yearwood's has been described as "crack"- while I have personally never made it, it sounds absolutely amazing.  One day... one day.


2.  Mango Fruit Roll-Ups from Just a Taste.  I LOVE me some fruit roll-ups.  I have been known to eat an entire box of the Betty Crocker type...although not recently, of course.  Absolutely not..ahem.  In any case, making your own is actually surprisingly easy.  Who knew!  


3.  Jolly Rancher Cookies from Domestically Speaking.  How cute are these?  Not to mention easy!  When baked, the jolly ranchers will melt and the heart cookies will have a yummy candy center.  Who comes up with this stuff?  Brilliant!  


4.  Bite Size Apple Pies from Goodies & Yum x Immaculate Baking.  Crescent Rolls have to be one of the most versatile baking options out there.  There are probably entire blogs devoted to the many thing you can make with a can of crescent rolls.  This is one such recipe, and of course it sounds delicious.


5.  Homemade Lemon Curd from Journey Kitchen.  I will be honest and admit that I am not actually well versed in what one is supposed to do with lemon curd... I imagine it can go inside pies, and on top of other desserts?  Perhaps inside a tart?  Regardless of what you do end up using it for, look at that gorgeous pure yellow color - it's sure to impress!


6.  Sugar Cookies with Jell-O Icing from Elgin Harvest.  I thought this was so creative - using Jell-O to help flavor and color frosting!  It seems like a quick way to add a unique touch to your basic sugar cookie.  Look how pretty the below cookies look in this picture!


7.  Tres Leche Cake from Alton Brown.  I am aware that a recipe from Alton Brown is not exactly blog-worthy... and when I say that, I mean that one of the Food Network's top chef's does not need this little blog entry to help him "get his recipe's out there".  I certainly try to include other blogs on my blog, but this recipe is SOOOO GOOD I had to include it.  Just try it.  Trust me.  


Monday, May 25, 2015

Love Grows Where My Rosemary Goes


 This is a super easy ol' standby that you can literally throw together in a pinch - you just need some:

  • Olive Oil (1 cup)
  • Rosemary (6ish sprigs)
  • A decorative glass bottle OR plain old tupperware
It seems as though infused olive oils should be much more complicated, but it really is as simple as heating up the oil, adding your flavors, spices, etc, and then cooling.  The official instructions are:
  1. Pout olive oil into a small sauce pan on the stovetop.  Add your rosemary sprigs.
  2. Heat oil over medium-low heat for about 6 minutes
  3. Let cool to room temperature
  4. Take the rosemary sprigs out of the oil, and place inside the decorative bottle.
  5. Pour olive oil into the bottle.
  6. Feel proud and accomplished for making your own infused olive oil!

I'm sure you can make infused oils with plenty of different seasonings and fresh herbs, but I have only ever made this rosemary olive oil.  It is DELICIOUS over popcorn with some salt, or in salad dressings - anything where a little kick of rosemary seems like a good idea.  (And really, when is rosemary not a good idea?)  Feel free to double or triple the recipe for a larger container, or if you are making multiple bottles.  The bottle shown in the picture holds about 1 cup of oil (as the recipe indicates) for context.  


This also happens to make a wonderful and thoughtful gift.  If you want to kick it up a notch, include a nice jar or bottle of popcorn along with it - who doesn't love the gift of popcorn!  Since we love popcorn in my house, rosemary olive oil has become a staple in our fridge.  You might notice the oil solidify after a week or two, but don't worry - just run it under warm water for a minute and it will be fine again.  Be sure and refrigerate after opening!

Also very good as dipping oil with some bread!


Wednesday, March 19, 2014

The Perfect Treat for Any Holiday: Sparkling Chocolate Dipped Pretzels


My favorite thing about these is how festive they are.  It's such an easy way to turn a generic snack into something exciting.  (Note how I found a way to add "sparkling" into the title!  Isn't anything that sparkles 10 times more exciting than something that doesn't?)  :)  

I feel like I am always in need of something quick to bring whenever we are invited to someone's house.  Jon and I usually bring a bottle of wine, but there is something so personable about actually making something for your host - whether it is an edible treat, or even something else they can enjoy.  (Side note - a friend of mine recently brought me homemade lipgloss - how nice is that!)  I also have a tutorial for some easy DIY Wine Charms which would be another great host gift!  


This quick treat is simple enough to whip up on a whim, and is unique enough to set you apart from anyone else bringing the usual bottle of wine.  I made these for a St. Patricks Day get together at my cousins house - hence the green - but you can make them festive for any occasion by changing the color of the sprinkles.


Ingredients:
Meltable white chocolate 
Pretzels 
Colored sprinkles
Parchment paper 
THAT'S ALL!

Instructions:
Melt the white chocolate - you can use a double boiler or the microwave.  I used the double boiler method the first time I did these, and a bit of the steam got into the chocolate and it seized up on me... TWICE.  I didn't even know chocolate could do that!  I used the microwave after that and it was much easier…even though I had to go out buy more chocolate unexpectedly…  it happens, right?


Dip half of the pretzel into the melted chocolate, and gently shake the excess away.  Scrape one side of the pretzel against the side of the bowl so you will be able to lay the clean side down on the parchment paper.  Holding the chocolate dipped pretzel over a bowl, sprinkle a generous amount of sprinkles over the melted chocolate until well coated.  Lay on the parchment paper to harden, clean side down.


You can also try using different kinds of sprinkles to liven these up even more - multicolor, perhaps?  Different shapes?  The sky is the limit!


Inspiration:  Love From the Oven

Wednesday, March 12, 2014

It's Nuts! A Basic Granola Recipe


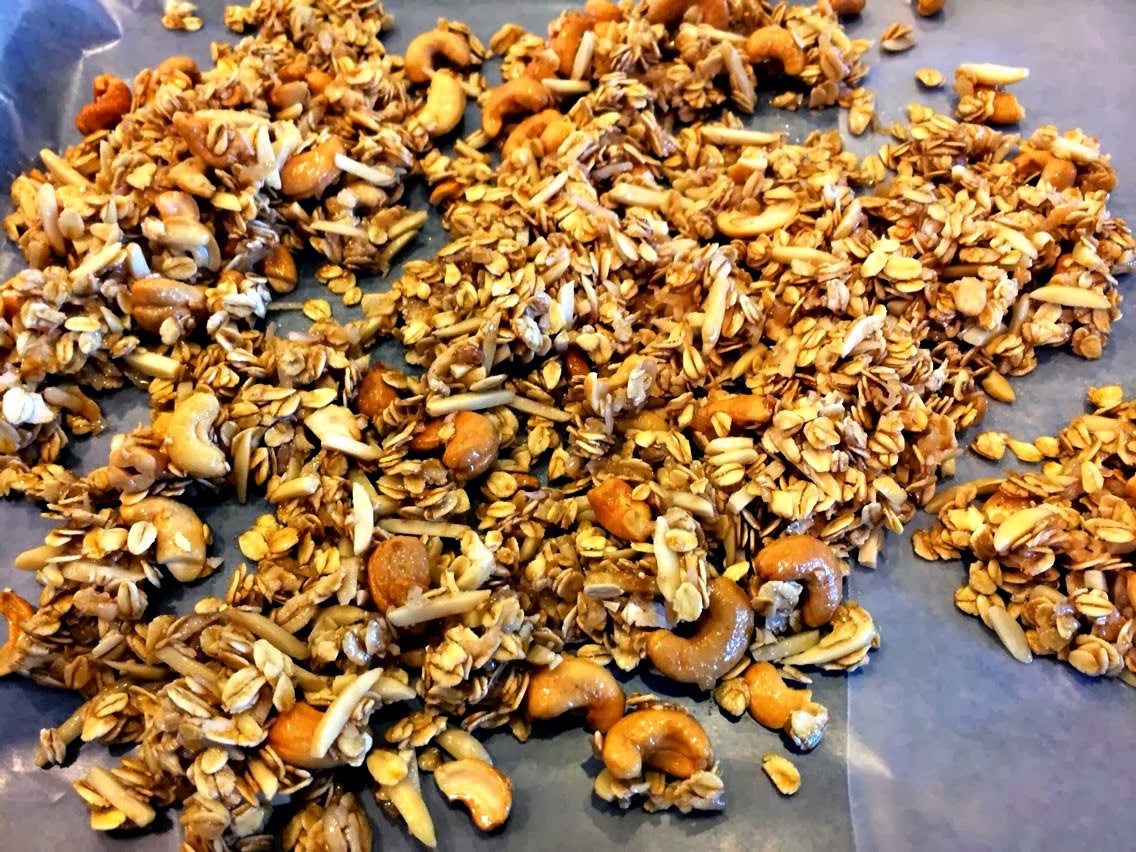
I made granola for the first time this past weekend!  My healthy breakfast of choice lately has been Nancy's Nonfat Vanilla Yogurt (with live cultures = good yogurt, it really is awesome) and granola.  However, all of my store bought granola doesn't seem to go very far, and I've seen so many awesome granola recipes I thought it was high time I gave it a try.


I based this recipe on Alton Brown's granola recipe.  (Alton Brown is one the chefs that I absolutely trust - love him!)  It turned out AWESOME!  Sweet, a tad salty, buttery and yummy!  I've actually been eating handfuls of it all day today, which I never would have done with my store-bought granola.  I'm not sure if it's any healthier than store-bought, but I am going to tell myself it is.  (Isn't everything that you make yourself healthier?)


INGREDIENTS:
  • 3 cups rolled oats (or "old fashioned oats" if you can't find rolled oats at your grocery store.
  • 1 cup slivered almonds
  • 1 cup cashews 
  • 3/4 cup shredded sweet coconut
  • 1/4 c. plus 2 tbs brown sugar
  • 1/4 c. plus 2 tbs maple syrup (REAL maple syrup!)
  • 1/4 cup vegetable oil
  • 3/4 tsp. salt
  • 1 cup dried fruit - raisins, dried cranberries, dried banana's… the sky is the limit, I think!  I used golden raisins.
INSTRUCTIONS:
1.  Preheat oven to 250 degrees.  In a large bowl, combine the rolled oats, almonds, cashews, coconut and brown sugar.  In another bowl, combine the vegetable oil, maple syrup and salt.  Mix everything together.  Spread the mixture onto 2 baking sheets.  Cook for 1 hour and 15 minutes, stirring every 15 minutes to make sure it is browned evenly.  Mix in your dried fruit until everything is well distributed.  Voila!  


Sooo good!  Next time I would like to try making a hawaiian granola.  One of Jon and I's favorite places here in West Seattle (well, in all of Seattle to be honest) is Marination Mai Kai on Alki.  They serve a homemade "Aloha Granola" with coconut and (I think) papaya, and it's pretty awesome.  Stay tuned for a future hawaiian themed granola recipe!

In the meantime, have a wonderful week!  

Like my awesome re-use of Classico spaghetti sauce jars??  :)


Monday, March 10, 2014

Lucky You! 7 Ways to Celebrate St. Patrick's Day


St. Patrick's Day is a lot of fun.  It's a good excuse to dye random foods green, give out colorful candy and blame unfortunate happenings on those pesky leprechauns.  The last few years, my cousin has had some of us over for some Guinness and corned beef - it's a good time!  This coming Monday, that is where you'll find me!  If you aren't sure how to take advantage of this random holiday, I've collected a few ideas I've found around the internet that I thought were fun.  If I had kids, unlimited resources or tons of time on my hands I think I'd do all of them.  As this is not the case, I hope you might enjoy one or two of them!  (Follow the links below to get the instructions/recipes, and/or to pin the images.)  

1.  Make some Rainbow Fudge to give out at work or school.

2.  Have some friends over and make your own Irish Coffee.  (Just like at the famous Buena Vista Cafe in San Francisco!)
Source:  YumSugar.com

3.  Give out green bracelets to save your friends or coworkers from a friendly pinch… :)
Source:  Living Locurto

4.  Kick back and enjoy a Green Leprechaun cocktail.

5.  Make some easy rainbow candy packs to give away to friends.

6.  Print out a free printable and display it at your desk for some extra luck.  
Source:  Mom 4 Real

7.  Serve a traditional Irish Dinner of Guinness, Corned Beef and Cabbage.  Yumm!
Source:  Tammilee Tips

Happy (early) St. Patrick's Day! 

*~*~*

Wednesday, March 5, 2014

Spamalot! A Recipe for Spam Musubi


If you haven't tried or heard of spam musubi, I understand if you are looking at this picture and thinking "what IS that…".  Well, it's spam.  Good old straight from the can spam, fried in soy sauce and mirin, layered with rice and wrapped in edible dried seaweed.  If you are still thinking "really, WHAT IS THAT", try and stay with me!  Because it's delicious.  

My boyfriend is Chinese, and has opened my eyes to many different types of foods over the past 4 years, one of which was spam musubi.  Spam musubi is actually a traditional hawaiian snack, which actually got it's signature square shape from the square cans that spam comes in.  (They would use the spam can to shape the rice into the now classic rectangular shape.)  

A can of spam!


I first had it at a restaurant, was reluctant to try it, but eventually did and haven't looked back since.  As the ingredients are really very simple, I've started making musubi at home, and wanted to share my recipe!  (Just trust me, it's worth a try for those of you who are new to spam or spam musubi in general!)  NOTE:  I am generally following the recipe for Spam Musubi from The Food Network.  It's my old standby.

INGREDIENTS:
5 cups cooked sushi rice (short grain rice)
5 sheets nori, cut in half lengthwise (dried seaweed) - you can get this at any asian grocery store
1 12 oz. can spam
6 tbsp soy sauce
4 tbsp mirin (a sweet rice wine used in japanese cooking - you can also get this at any asian grocery store).
4 tbsp sugar
Furikake, to taste (Furikake is a dry Japanese condiment that consists of spices, sesame seeds and perhaps some dried/ground fish.  It is meant to be sprinkled on top of rice, and comes in many different flavors - you can also find this at an asian grocery store.)

INSTRUCTIONS:
1.  Cut spam into 10 slices.  I actually have a spam slicer (ahem, a luncheon meat slicer) that I got from Amazon, but you can totally go old school and use that thing called a knife.
That is a tower of spam, my friends.
2.  Place the spam slices in a pan and fry them on both sides until they are slightly crispy and browned. Remove and drain them on a plate lined with paper towels.  In the pan, combine the soy sauce, mirin and sugar.  bring this mixture to a boil over medium high heat, and then reduce to a simmer.  Add the spam slices and coat them in the mixture - once the mixture has thickened (about 5 or so minutes later), remove them from the pan.

Soak the musubi in the pan until the mixture has thickened.

3. Now comes the fun part - the musubi assembly!  I actually bought a musubi maker for this part, but you can probably just use an empty can of spam that has been opened on both sides - as you'll notice, they are the same shape!  :)

Yes, there is such a thing as a musubi maker.
 Lay a sheet on nori on a clean surface - I just used a cutting board.  Moisten the lower half of the musubi maker, and place on the lower third of the nori.  Fill with rice, and press to pack the rice down snugly.  Remove the musubi maker.  Sprinkle your cute little rectangular rice mound with the furikake, and top with a slice of spam.  (You can keep your musubi maker in a little bowl of water nearby, to keep it from sticking to the rice.)

  
4.  Starting at the end closest to you, fold the nori over the spam/rice stack, and keep rolling until completely wrapped in the nori.  Slightly dampen the seam with some water so it sticks together and seals.  Repeat this until you have used all of your spam slices!

Wrap the spam/nori mixture in the nori.
You are all done!  You can wrap each musubi in plastic wrap, and they will keep for several days - perfect for a snack on the go.  If you are new to the wonders of musubi, I hope you have mustered up the guts to try one! I will admit that other than this, I am not a fan of spam… but maybe one of these days I can learn to cook with it more.  Are there any foods you love that might be strange to other people?  Please share!