Wednesday, January 29, 2014

An Easy Hostess Gift in a Pinch...


Charmed, I'm sure...
These were SO EASY it was almost disgusting.  Why anyone would spend upwards of $20 for 8 wine charms (or something) is now beyond me.  Don't fall into the trap - these are so easy!  And they would be adorable as gifts.  I went a little crazy making these and now have a jarful of them, but I figure we'll always have them on hand, and they would be a good hostess gift in a pinch.  In fact, they came in very handy when I hosted a birthday brunch for my mother this morning, and everyone was able to tell their Bellini glass apart.  :)  Not bad, if I do say so myself!

Note as of August 2015:  I now have these beaded wine charms FOR SALE in my Etsy shop, if you would rather not spend the time making your own.  Each set of 6 is sold with a round tin for easy storage.  

Materials:
Beading Hoop Earring Loops (You can get these on Amazon, or they can also be found at any craft store.)
Beads to your taste
Wire Pliers

Instructions:
The beading hoop earring loops will probably come with one end bent upwards in a little hook, so that it hooks onto the loop.  To put beads onto the loop, you will need to use pliers and bend this little hook flat, so that your wire is nice and smooth.  String your beads onto the wire loop in whatever fashion you desire.  Use your pliers to bend the end back into it's hook shape.  COMPLETE!  Repeat 8 or so times for a nice little set that you can give as a gift - remember to use different beads so each one is different.


Yes, I went a little crazy here.  But the jar filled with them looks so pretty!


Saturday, January 25, 2014

My Colored Votive Addiction: Glassybaby


I adore Glassybaby's.  If you don't know about them, shame on you - check them out immediately.  Similar to my obsession with paint chips, I find all of the colors so inspiring.  (Glassybaby also donates a portion of their sales to various charities - the founder is a multiple-time cancer survivor, and many of these charities benefit cancer research.)  Truth be known, I have way too many of them, and was running out of ways to artfully display them in my house, other than placing them in various color clusters in different places.  However, we had a spare wall space near our kitchen, and I found these great floating shelves from Overstock.com.  I bought them, hung them, and thought they would be a perfect way to display my Glassybaby's!


I wish I had better picture-taking skills to do these pictures justice, but I really like how these turned out.  It's a little more unique than another picture hanging on the wall, and really makes the Glassybaby's a statement piece.  Love them!  


Monday, January 20, 2014

Centerpieces on the Cheap


I was planning a large dinner for a work event recently, and while we didn't actually end up using these for centerpieces (we ended up going the traditional route and used a bunch of fresh flowers), I still thought they were pretty cool - especially if you wanted to try something a little different and/or extra colorful.  Note that an LED candle is a must here, since a real candle might catch the tissue paper on fire… which would be no good for your event…!

Materials:
Tissue Paper
Glass Jars
Scissors
LED Candle

Instructions:
Create flowers out of your tissue paper.  I followed this amazing guide to determine what kind of tissue flowers to make, how to cut the tissue, etc (from my Pinterest):


Put an LED candle in your glass jar, and put the tissue paper flower on top.  Donzo!  You could also make a bouquet of these if you like - what a lovely way to decorate for a party!

Sunday, January 19, 2014

Even the dogs are rooting for the Seahawks!

If you live in Seattle, you know how our city has been taken over by a Seahawks fandom epidemic.  Yes, we are a bandwagon town, but it sure is fun when we're actually doing well.  Your morning barista suddenly has her face painted green and blue on a regular basis, and it's a regular occurrence for the car next to you at the stoplight to have two 12th man flags flying from it's antenna.  Anyway, today is a big game, and when Jon and I stopped in at Bakery Nouveau this morning for some morning treats, we saw that even the neighborhood dogs have been getting into football.


It makes me want to give Shipley a mohawk right before we shave him as soon as the weather gets better!  By the way, Bakery Nouveau is amazing - they have the best croissants and macaroons.  Therefore, I have of course included them in my Local Guide to Seattle.  Definitely worth a trip out to West Seattle!  In any case - go hawks!  

Saturday, January 18, 2014

Inspiring Image #3


Balloons rise up above Pigeon Valley in Turkey.  Source: Living Pierside on Tumblr, from my Pinterest.

Friday, January 17, 2014

It's Friday!


Who doesn't love Fridays?  I wrote this short poem today on the bus after dropping Shipley off at Doggie Daycare.  Enjoy your weekend!

Friday

The alarm goes off, and I'm not filled with dismay,
As I might be on any other day.

The air seems clearer, the sky a bit brighter,
My step even seems to feel a bit lighter.

My usual annoyances seem to decline,
'Cause I'll have a break for 2 days time! 

It can be so joyful, it's almost against reasoning,
But very little holds promise like a Friday evening.  


Sunday, January 12, 2014

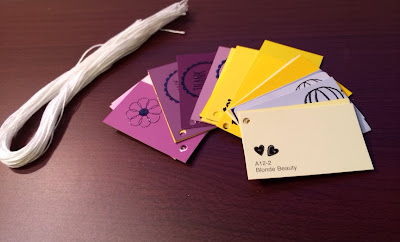
Gift Idea: DIY Paint Chip Gift Tags

I have a lot of paint chips lying around, and not just from my artichoke paint chip project.  There is something so inspiring about them to me - the gorgeous arrays of colors, and then the beautiful color NAMES!  Who comes up with those names?  "Evening Hush" (blue), "Stained Glass" (blue), and "Happenstance" (also blue).  "Old Mission Pink" (pink), "Palisade Orchid" (pink) and "Santolina Blooms" (you guessed it… another shade of pink.)  Who knew that happenstance had it's own color?  Because I find paint chips so inspiring, I had a color wheel of paint chips laying around that I have wanted to do something with.


So, as they are about the same size, I thought that my paint chips would make perfect gift tags!  (And I was right!) 


Materials:
Paint Chips
Rubber Stamps
Embossing Powder (if desired)
String
Hole Punch

Instructions:
Cut your paint chips accordingly.  Collect some appropriate rubber stamps for your gift tags (I particularly like the "to/from" stamp and the "thank you" stamp for this purpose - if you don't have these types of rubber stamps, they are readily available on Etsy!)  I also preferred to emboss them rather than simply stamp them, as I thought this gave the tags a much more finished look.  For those who are scared of embossing - DON'T BE!  It's as easy as sprinkling some powder and waving a hair dryer.  I was suckered into it in a stamping store and talked into buying an actual embossing gun, and when I actually used it…I realized that I had just paid $30 for what is essentially a hair dryer, which of course I already owned.  Now you are in the know!


Use a hole punch and punch a hole in the corner of the paint chip, and tie some string through it - now it is gift ready!  These would also make a really adorable gift for someone by themselves - just package them up in a pack with some string.  (I used embroidery thread, which seemed to be the perfect consistency for this.)  


Now happy gift giving!  These could also be used as tags for wedding favors or for escort cards.  I know I would would feel pretty special receiving a gift with a tag with it's own special, inspirational color on it…!


DIY Guest Room Art


So I tried the quote art thing a couple of weeks ago, and it was an official "DIY Defeat" situation.  HOWEVER, I learned a thing or two, and this weekend I was back for more.  Instead of using cheap stickers for lettering, I only used vinyl lettering (which you can find online or at the craft store).  I also got blank canvases and painted them myself with spray paint - first with metallic gold (for the lettering), and then a deep blue to match our guest room.  These turned out much better than before, and I love how welcoming they make our guest room look!  

Materials:
Blank Canvas(es)
Spray Paint 
Vinyl Lettering 
THAT'S IT!

Instructions:
Spray paint your canvas whatever color you'd like your lettering to be.  You can also follow what I tried the first time and just skip this step, using a pre-painted canvas from the thrift store or something.  Once you have a painted canvas, use your vinyl lettering to spell our whatever words or phrases you'd like.  Make sure you use a ruler for your lettering to be straight!  Also, pay attention to the spacing between your letters.  If it's too messy, it will look a little too "DIY", if you know what I'm sayin'.  Once you have your vinyl lettering on, spray paint again in a different color.  Wait to dry, and then peel off the vinyl lettering.  That's it!  You're done!


I really like how both of my canvases match, and am satisfied with how these turned out.  Also, using spray paint, the paint dries within 30 minutes!  Such a quick and easy project to brighten up a room…!  :)


Thursday, January 9, 2014

I Love Seattle

I was especially inspired by Seattle today - which is ironic, considering it is currently the rainiest, wettest and darkest time of the year for us Seattleites.  Nevertheless, I have created a "Local Guide to Seattle" of my favorite things to do in this city - restaurants, locations - the works.  I encourage you to check it out…!  I also wrote a poem in honor of Seattle, below.  If you are from Seattle, I hope it brings a smile to your face.  If not, I hope it inspires you to come here!  


I Love Seattle

All of the trees don't seem quite as green
Unless they are forests of evergreens.

The bartenders don't seem to have the same skill
Unless they work on Capitol Hill.

The blue of the sky doesn't seem quite as grand
Unless it's from the top of Queen Anne.

Fish flying through the air might seem a disgrace
Unless it happens at Pike's Place.

Gum left on a wall is no reason to dally
Unless you are wandering through Post Alley.

You haven't completed a date with your fella
Until you've shared a kiss beneath his umbrella.

You don't appreciated the beauty of a sun ray
Until you're accustomed to a veil of gray.

You'll start to dream of clouds the further you roam
And they will remind you of your northwest home.  

No matter how far you go, no matter where you settle
No place will make you feel quite like Seattle.  

Gift Idea: DIY Decorative Jars (Filled with Goodies, and Reusable!)


A couple of months ago, I got REALLY into painting glass, and bought an assortment of the Pebeo Vitrea glass paints.  What is really cool about these is the fact that you can just put your painted glassware in the oven, and it essentially fires it for you, making your item reusable.  Fabulous!  I couldn't get enough.  :)  I also recently had an obsession with mason jars, so fortunately I had plenty of glassware around to experiment with.  While most people use glass paints to decorate actual glassware (drinking glasses, wine glasses, martini glasses, etc) I hadn't seen as much of mason jars being painted, and I thought this was an excellent idea.  So, I grabbed a few mason jars, and got to work!  These turned out perfect for Christmas gifts this past year, and the best part about them is that your giftee can re-use the jar... so it's essentially 2 gifts in 1!  A word of caution - I found glass paints rather addictive, so try and control yourself. 

Materials:
Glass Paint (I used Pebeo Vitrea Paints)
Paint brushes
Glass Jars
Colorful Baking Cups
Goodies to fill your jars with (I made Martha Stewart's Bath Fizzies - http://www.marthastewart.com/271871/bath-fizzies)  Candy would also work! 

Instructions:
Gather your mason jars, and decorate with the glass paint as you see fit!  I like the confetti look, as it's simple and turns out nice and elegant.

Fire your painted mason jars according to your paint's instructions.

Fill with your goodies!  I put the baking cups over the mason jars right before I screwed on the rims, giving them a more decorative look.  I also printed out some labels to describe my bath fizzies, and attached a tag that read:  "A note about the jar:  I have been fire-sealed and am re-usable!  Use me with candles or for storage!"

And there you have it - two gifts in one!  I really like how they all look in a row.  :)


Inspiration:  "Easy Anthropologie Confetti Tumbers" on Radical Possibility:  http://www.radicalpossibility.com/2012/06/easy-confetti-tumblers.html


Thursday, January 2, 2014

A Note About TEA - and Happy New Year!


I am a fan of tea.  It makes everything better.  While I have also been known to be a fan of coffee in a past (and maybe recent…over a month now and counting!) life, it is a fact that my relationship with tea has always been nothing but positive.  I am currently in the process of trying to appreciate green tea more; I've heard all the stories about the health benefits, the anti-oxidants, the weight-loss benefits, etc… and I am intrigued!  While a cup of green tea has nothing on a nice steaming cup of Lipton, a splash of cream and a cube of sugar in my life (I like cheap tea, so what!)… I'm getting there, and it certainly is it's own form of relaxation.  

Speaking of tea - if you live in the Seattle area, there is a tea house that just opened that serves Rooibos Tea Latte's, which is my new favorite thing!  I believe they are the only ones doing it at the moment - it is Rooibos tea that is ground very fine, pulled through an espresso machine, and finished with honey and cinnamon (or nutmeg… unfortunately I am not sure which at the moment!  Either way it's divine.)  They are on Queen Anne Hill, in a South African tea shop called the Cederberg Tea House.  Check them out!  Thank me later!

Finally, I saw an opportunity today to combine two of my loves - tea and crafting.  I've collected some crafts I'd like to try based on my love of tea, and wanted to share them.  They would make such lovely gifts for any tea lover!  (Note that I have NOT tried these projects, but don't they all look like a lovely afternoon would be spent making them while watching Anne of Green Gables?)  I intent to try it one of these days before 2014 gets too crazy.  Enjoy!


SOURCES, CLOCKWISE FROM TOP LEFT: